Abstract
Awake fiberoptic intubation remains the safest approach to managing the Difficult Airway. It is a difficult, multi-step procedure that can be time-consuming if not performed frequently. Primitive cough and gag reflexes can be challenging to block quickly with topical anesthetics. We describe a streamlined approach with nerve blocks that allows the procedure to be accomplished safely and smoothly in minutes. We hope that this expedient approach to the awake intubation will increase both the speed and frequency in which it is performed.
Introduction
We have been fortunate to perform daily awake fiberoptic intubations for many years because of the great number of cervical spine procedures performed at our institution on patients with severe cervical myelopathy. Daily repetition has given us the opportunity to streamline the approach and perform the procedure in less than 10 minutes. It is our hope that this description will help others to increase their speed, and subsequently the frequency, in which they perform this vital procedure. We highlight the potential pitfalls of the technique and how best to avoid them.
The awake fiberoptic intubation is not performed daily in most settings, but it remains a critically important lifesaving procedure in every single operating room, emergency department, and intensive care unit. The difficult airway [1] presents to each of these settings in different ways, but failure to recognize and proactively manage it can have tragic results that are often avoidable. The most recent Closed Claims report on Difficult Airway management revealed that we have made little progress in managing the difficult airway since the introduction of the Difficult Airway Algorithm by the American Society of Anesthesiologists three decades ago [2,3]. Embracing, practicing, and perfecting the awake fiberoptic intubation might be the only way to decrease morbidity and mortality in these patients. That report noted several cases where awake intubations were initially attempted and then aborted prior to the induction of anesthesia-and subsequent airway loss [3]. It is our hope that this technique will provide further insight into the management of these difficult scenarios so as to avoid airway loss.
Predicting Difficult Airways
The indices that predict difficult intubation are well described and numerous [4]. The thyromental space and its compliance might be the most predictive of difficulty, but the tremendous variance in patients and presentations has resulted in nearly every patient being assessed in several objective ways. Bedside assessments of Mallampati score, mouth opening, thyromental distance, and cervical extension are often routinely performed with an airway plan determined by the potential for failure that these assessments provide. When one assessment is especially poor, the decision about how to intubate is made easier. But when patients have several slightly suboptimal indices the decision becomes more difficult because very few are likely to perform an awake intubation when the potential to fail with conventional tools appears to be low.
The risk factors that predict difficult ventilation are different than those that predict difficult intubation [5], but they are more important to determine since the failure to ventilate can be a more urgent problem when it does occur. One must provide adequate mask seal and prevent pharyngeal obstruction to maintain airway patency with a facemask. The most common characteristics that threaten mask seal are excessive facial hair, a prominent nose, and lack of teeth [5]. One might expect to encounter difficulty in preventing obstruction in the obese patient, those who snore heavily, or those with sleep apnea. When there are factors that predict both difficult intubation and difficult ventilation, one should consider performing an awake intubation to avoid the dangers of the cannot ventilate-cannot intubate (CVCI) scenario.
Planning and Sedation
After deciding to proceed with an awake intubation, the next steps lie in the personality of the patient, the urgency of the clinical situation, and how (or if) one chooses to sedate for the procedure. The interplay between all of these variables is so tightly intertwined that it is difficult to address them separately (Figure 1), so remain strongly goal-oriented from the moment you meet the patient. Your explanation of the process is the first step towards cooperation, and it helps to more safely decrease any sedation that might be needed.
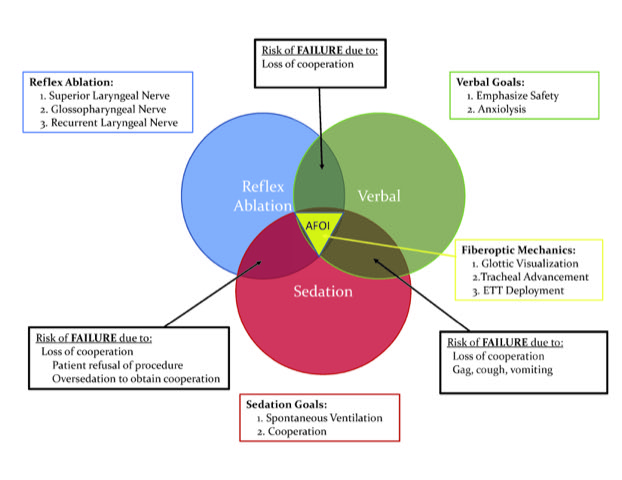
Figure 1: Awake Fiberoptic Intubation Venn diagram: Putting it all together.
The primary goal for accomplishing awake intubations is the safe maintenance of spontaneous ventilation throughout the procedure, Goal 1. The secondary goal is the cooperation of the patient in order to facilitate the spontaneously ventilating endotracheal tube (ETT) placement, Goal 2. Any other goal one might consider (anxiolysis, analgesia, amnesia, or even the optimization of optics on the fiberscope) are truly tertiary, they might be desirable, or even altruistic, but their pursuit cannot compromise Goal 1 or Goal 2. Spontaneous ventilation and cooperation sound simple to accomplish, but they often are not in these situations. The aforementioned tertiary goals might help to optimize the procedure and enhance patient cooperation, but if sedative agents are not titrated deliberately (steady drip of intravenous line to avoid stacking doses), then the cooperation of the patient can be quickly compromised (Goal 2). If procedural fixation further affects priorities, then spontaneous ventilation can be threatened as well (Goal 1). The procedure should be so quickly performed that the infusions of any medication are unnecessary and, of utmost importance, do not forget the reversibility of benzodiazepines and opioids during complex sedation for the difficult airway. It is tragic to proceed further down the Difficult Airway Algorithm due to the inadvertent overdose of agents that are readily reversible.
We have found low-dose ketamine to be extremely useful in this setting as a cooperative analgesic that maintains respirations. It helps to arrive at a starting point quickly while significantly decreasing the dose of other agents. Stay low-dose (5-20 mg) for difficult, urgently threatening scenarios, reserving higher (20-50 mg) doses for the uncooperative or those patients with preexisting drug tolerance. Ketamine has longstanding “battlefield” utility, and it may be the only reasonable drug in some settings. Dexmedetomidine works well also, but instead of a continuous infusion, we bolus it 4-8 mcg at a time. Like ketamine, this agent has become even more useful this past decade with more patients presenting with a tolerance to opioids, benzodiazepines, or both. There is no cross tolerance between benzodiazepines and opioids, so tolerance to one of them will produce a sensitivity to the other.
Patient Discussion
Intertwined with the reasoning behind the awake intubation, the patient’s stoicism, your plans for anesthetizing the airway, and your pharmacologic choices, is your verbal interaction with the patient. The importance of this discussion cannot be overstated because it holds each aspect of the procedure together: from introductions, through nerve block injections, tube placement, and subsequent induction. The confidence presented to the patient is vital to gaining trust, directing sedation choices, airway anesthesia, and perhaps even the best tool for ETT placement (FOB vs. lightwand or others). This must be primarily an anxiolytic exchange, so avoid daunting terms like “awake, needle or throat.” This could compromise your cooperative goals from the onset and force heavier sedation, which can threaten spontaneous ventilation. For this procedure, your discussion is more than explaining the complexities to follow, it is actually the foundational thread of the entire endeavor-ending only with continued reassurance while taping in the endotracheal tube.
Many doctors need some practice with their reassuring demeanor. Intersperse lay and medical terms as appropriate to minimize anxiety, check back with the patient throughout the procedure for encouragement, but ask no questions since you will be in their mouth much of the time. Gentle engagement will keep cooperation high and lower the sedation needed to keep the procedure safe and quick. “Hey, Mrs. Jones, the fact that your neck is broken has us all a bit concerned. We need to place a breathing tube in your windpipe safely without moving your neck. We are going to take away your gag and cough reflexes for a few minutes to do this. Do not worry, we are going to keep you comfortable the whole time, and you won’t gag, cough, or even care. You might not remember any of it”… or whatever works best for you. We have learned over time that failure to communicate reassuringly about the impending procedure has led to most of our more problematic awake intubations. The charming, interpersonal exchange, can be more challenging to develop than the more exciting steps that follow, but there is no doubt that its avoidance has played a role in lost airways.
Reflex Ablation
Periglottic cough
Coughing at the glottic opening is triggered primarily by the superior laryngeal nerve (SLN) branching back into cranial nerve ten. There are several ways to ablate this reflex, from gargles, ointments, sprays, and nebulizers to nerve blocks at various locations. Many choose to actively skip blocking this nerve altogether since it only covers a small part of the intubation pathway. However, skipping this block will always result in periglottic coughing and decrease satisfaction with the approach. The patient with an unstable cervical spine or any patient with whom you have established a rapport deserves a cough-less awake intubation.
The SLN block is very easy to perform. It is also the best block to do first because it provides feedback on the effectiveness of sedation: eyes-closed sedation while opening to command is ideal. Patient grimacing during this easiest block will trigger a little more sedation for the more difficult blocks to follow. The fastest way to perform this block is to simply place your finger on the thyroid notch (incisura) and use a small, short needle since the target is very shallow (~1 cm). This site is very easy to locate on males, but it may take a little more palpation with females since their incisura is less prominent. Be certain that you are injecting into the thyrohyoid membrane (THM) between the thyroid cartilage and the hyoid bone. On a larger patient, direct the needle at 10 and 2 o’clock off of your finger, angling the needle slightly medial until you have gentle entry into the THM bilaterally (Figure 2). This is known as the one-third approach since it is one-third of the way from the midline to the lateral edge of the THM [6]. Place 3 ml of local (1% or 2%) on each side to soak the SLN as it courses through the THM [6]. Injecting directly into the membrane (mild resistance) works well and sets up quickly. Injecting into the fat pad just deep to this membrane will also block the SLN, but coughing on injection means you have gone too deep and may be in the vallecula. Direct the needle medially, despite the lateral location of the nerve, for three reasons: 1) it is easier and any entry into this membrane will produce enough spread to anesthetize the nerve; 2) directing laterally might lead to misplacing the anesthetic outside of the THM into the periglottic space, which had high failure rates (up to 14%) when this was first described as the target off of the greater horn of the hyoid bone [7], and 3) one would prefer not to directly contact this very small and important nerve with a needle.
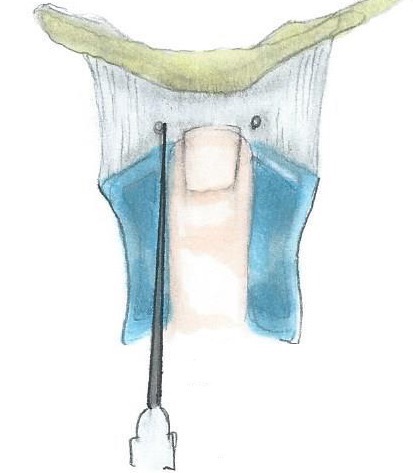
Figure 2: Superior Laryngeal Nerve Block: Illustration of the “1/3 Approach”.
This SLN block works very well on everyone regardless of body habitus. We have recently moved towards performing a single midline injection of 5-6 ml for smaller patients with excellent results as well [8]. There is no midline septum in the THM, so an adequate quantity of anesthetic spreads bilaterally to immerse every part of this small membrane and the afferent branches of the SLN that pierce it. This midline approach has made this block even easier, especially when the clinical scenario demands a particularly expedient intubation.
We use the one-third approach with two blocks most of the time when teaching others, and for larger patients, to better guarantee periglottic cough ablation. This block cannot be “tested” until the fiberscope actually gets to the glottis. There are, however, some potential pitfalls for this block: those with profoundly altered anatomy from a goiter, periglottic/thyroid malignancies, and those with prior burns or radiation treatment to this region – which limits the spread of injected local anesthetics. We switch to topical anesthetic approaches in these situations with either 5% lidocaine paste on a tongue depressor or oral airway (when aerosolization is discouraged) or 4% lidocaine as either a nebulization or gargle. Topical anesthesia is much slower and significantly less reliable, so we only revert to its use when it is the only or best option available. Anticoagulation status might alter one’s approach to injections, but it is such a superficial block that we usually use a smaller gauge needle and hold pressure longer. Holding pressure with gauze to prevent small hematomas and cleaning off surface bleeding is strongly encouraged when introducing this block to your institution, especially for anterior cervical procedures. Small needles and a few seconds of post-injection pressure will allow the neck to appear undefiled prior to surgical prep and approach.
Intraoral gag
This is the most critical reflex to block for awake oral intubations; thus, it might be the only one to consider in a dire emergency. If a patient is hypercarbic and/or hypoxemic such that oral suctioning elicits no response, then simply place the breathing tube with no further airway anesthesia or medications, with or without the fiberoptic bronchoscope. We try to use the fiberoptic bronchoscope in this situation if the patient is larger or might otherwise be a challenging intubation, so they can more adequately maintain spontaneous ventilation throughout the procedure, but the lightwand works very well in this situation also-especially on smaller patients who appear micrognathic. This intubation should be very fast with a little mandibular protrusion and or an Ovassapian airway to help control the tongue, keep the operator midline, and protect fingers and fiberscope if the degree of obtundation is overestimated.
If, however, there remains some gag response, then it must be blocked to facilitate any airway plan you have and prevent vomiting during the procedure. If there is any evidence of gag after attempts to block it—stop and repeat that attempt or add a different method to ablate this critical reflex. Not only will proceeding with an intact gag torture the patient, it will negatively impact everyone witnessing the procedure and yet again, it could induce vomiting. Many an operating room or critical care nurse cringes at the mention of the awake intubation because they have seen too many that appear to be harming the patient – usually from the failure of gag ablation.
A very fast and very effective method to block the glossopharyngeal nerve (GPN) as it leaves the base of the tongue is a 2 ml injection of 1% or 2% lidocaine into the palatoglossal fold. This is easiest if one takes a straight (Miller) blade along the lower lateral aspect of the tongue and gently retracts medially while advancing (Figure 3). This approach takes a little finesse and practice to prevent gagging while exposing the fold, but if the blade is kept parallel to the molar ridge while gradually advancing, one can avoid stimulating a gag from tongue compression. The fold is evident between the tongue and anterior tonsillar pillar right behind and medial to the molar ridge. This small bridge of tissue carries the lingual branch of GPN from the tongue and an injection here quickly ablates the gag reflex that is elicited from pressure on the posterior third of the tongue. This injection densely blocks the gag response in 10 seconds and lasts about 20 minutes depending on the dose injected. It is most easily accomplished with a longer needle (25-gauge spinal needle) because you can better see the injection site if the syringe remains outside of the mouth. It has a very high success rate because it anesthetizes a single more proximal nerve instead of the thousands of pressure receptors (Pacinian corpuscles) within the tongue that need to be anesthetized with topical approaches. Twenty-five is the ideal gauge for this injection, as 22-gauge needles might cause some bleeding and 27 gauge lack the rigidity needed to penetrate into the palatoglossal fold.

Figure 3: Glossopharyngeal Nerve Block: Needle inserting into the left palatoglossal fold.
There are some pitfalls to this block as well, the first being the amount of practice it requires to master. If it were easy to do, everyone would already be doing it. It has failed to gain universal popularity, however, because it takes instruction and practice to develop the technique. Everyone needs to practice this difficult exposure a few times before they gain agility – with larger tongues and poor mouth opening increasing the difficulty of the block (a larger curved Macintosh blade may be helpful for the exposure on those with macroglossia). We initially teach residents side-by-side, looking over our shoulder on that first one so they can orient to the approach [9]. This part of the procedure is also more stimulating than the THM injection for SLN blockade, so optimal cooperative sedation is imperative. This deep exposure and subsequent intraoral injection is what first led to adding ketamine to the sedation regimen. This “anterior” approach uses the anterior tonsillar pillar to guide one to the palatoglossal fold and the lingual nerve at the base of the tongue. Occasionally, however, it can fail to spread proximally enough to also block the gag response from pharyngeal pressure – usually in the morbidly obese patient.
There is a deeper pharyngeal branch of the GPN that innervates the pharynx. That exposure and injection site is more difficult to attain since it is in the pharyngeal wall behind the posterior tonsillar pillar. Therefore, we try to avoid pharyngeal pressure throughout the procedure by keeping the fiberscope anterior and along the tongue throughout the procedure. If one is unable to approach the glottis without a breakthrough pharyngeal gag response (very rare), then applying 5% lidocaine paste to the back of an oral airway or gargling 4% lidocaine can help to supplement the ablation of the pharyngeal gag. For very large patients, consider beginning with a topical approach for the procedure by introducing an oral airway with 5% paste prior to rolling to the room and beginning the blocks. Dense gag ablation is more important than remaining purely topical or purely injection for any given case. Using both approaches preemptively on the most challenging patients will guarantee gag ablation every time.
If the mouth cannot be opened far enough for this block despite planning an oral intubation, one can still block the GPN more proximally at the styloid process. This will prevent gagging from both pharyngeal and lingual compression by blocking both branches further up the ninth cranial nerve. Understanding the anatomy of this block is very important since the carotid artery and internal jugular vein lie directly behind the styloid process. Thus, we place 3 ml of anesthetic directly on top of the styloid process to block the nerve through deeper spread towards the jugular foramen. If mouth opening is not possible at all or a nasal intubation is planned, then glossopharyngeal blockade is less necessary. Nasal intubation allows access to the larynx with little pressure on the posterior tongue or pharynx.
Subglottic cough
The recurrent laryngeal nerve (RLN) is the branch of the tenth cranial nerve that innervates the trachea below the glottis. Blocking this is accomplished topically, either with a transtracheal injection of a topical anesthetic (5 ml of 4% lidocaine) or from supraglottic sprays, gargles, nebulizations or melted paste (5%). This block is usually done last because it is even more stimulating to the patient than the glossopharyngeal block, even though it requires a little more soak time (90 sec) for mucosal penetrance. It is an important block to maintain the trust of the patient and to prevent excessive stimulation with placement of the fiberscope and ETT. It is especially useful for intubations done for neurologic reasons, since the “tube tolerance” it provides allows for a four-extremity assessment without coughing. With proper analgesic sedation and a cooperative patient, tracheal entry is usually quite easy with a 19- or 20-gauge needle through the cricothyroid membrane (CTM) at ~1 cm in depth. Most patients will be able to hold their cough for a couple seconds during injection, only to then cough it around at your request when you remove your needle. The ideal time to inject is after end-exhalation as this gives the patient the best opportunity to hold their cough. If sedation prevents any cough upon injection, then coach a voluntarily cough to spread the anesthetic throughout the trachea – from the carina to the bottom of the glottis. Oftentimes, the carina is not fully blocked, so we try not to let the fiberscope advance too far beyond the site of needle entry through the CTM. If one fails at needle entry into the trachea, then advance the fiberscope to the cords and inject 4% lidocaine through the fiberscope and into the trachea or advance an epidural catheter through the working channel of the scope into the trachea. Do not advance the catheter too far beyond the vocal cords, as RLN blockade just below the cords is the most important place to anesthetize for awake intubation. Make sure to allow enough time for any topical anesthetic approach to set-up, about 90 seconds with 4% lidocaine. There will always be inadequate intra-tracheal anesthesia if one intubates immediately following the injection of topical anesthetic.
There are a few circumstances where one would not wish to place a larger needle through the CTM: periglottic malignancies, large goiters, anticoagulated patients, and imminent heparinization, to name a few. Good subglottic cough ablation can still be accomplished with a little more time. Nebulized lidocaine is the best way to get complete coverage below the cords, but it will require a little coaching and still more time. This usually requires 2 vials of 4% lidocaine (10 ml), an early antisialagogue, and encouraging the patient to hold their breath for 5 seconds every fifth breath to get intratracheal anesthesia. Each of these steps is important; if one of them is not accomplished then the patchy block and coughing will make you long for the density of direct application. Some inquire about the potential for local anesthetic toxicity because of the quantity of drug being delivered. The rate of anesthetic absorption during awake intubation has kept us from ever witnessing any seizures after many thousands of them, but it is prudent to decrease the dosage with much smaller patients. There are six separate nerves to block in order to facilitate a smooth and rapid awake intubation, miss but one of them and the technique deteriorates quickly. Take a stepwise approach, be meticulous about reflex ablation, and make the awake intubation a procedure that is safe, fast, and fun.
The Fiberoptic Bronchoscope
With good sedation and airway anesthesia, one can do an awake intubation with several different tools. The fiberoptic bronchoscope is the easiest of them to use because of the gentle way it can enter the trachea. Its flexibility, however, is also what makes it a difficult device to master. Thus, we break the awake intubation with the fiberscope into three separate skills: glottic visualization, tracheal advancement, and endotracheal tube deployment.
Glottic visualization
The key point of this first step is to hold the scope and manipulate it in such a manner that the first look into the scope is at the vocal cords or epiglottis. Hold the scope a short distance (about 10 cm) from the end such that your non-dominant index finger is at 12 o’clock and your thumb at 6 o’clock on the distal scope. This establishes your understanding of where the tip is heading. Place the eye piece to your dominant eye and pull the scope taut between your hands to further help control the scope. Use the flexion-extension trigger to position the tip of the scope into a soft “comma-shaped” position directly above the glottis. Then, place your advancing hand gently on the patient’s face to help remain in the midline. After a little practice with this approach, there will be no time wasted “finding” the glottis, it will simply be there at the start. If it happens to be hard to find, pull back and assess the problem by using both of your eyes and both of your hands. Most patients prefer to be inclined or seated during an awake intubation, unless they have an unstable cervical fracture. Your scope work will be easier from in front of the patient because you can look them in the eye and more easily feed the scope around the tongue to a supraglottic position. This will minimize “scope time” while maintaining rapport with the patient.
Tracheal advancement
Once the epiglottis or cords are seen, hold the scope straight and taut between your hands. This “archery” approach will help to advance the scope because it allows you to release the distal forefinger without letting the scope move laterally. The distal hand is gently rested on the patient’s face to provide fine motor control. From this position, three or four “pulls” over the thumb will advance the scope between the cords. The operative word is “pull” since the scope pulls much better than it pushes. The overly flexible fiberscope can be more readily controlled when it is held taut and pulled because pushing leads to bending and bowing of the scope – forcing your distal hand to pinch and twist for control. The flexion-extension trigger at the eyepiece will need to be gradually released as the tip advances towards the cords. This feels like discreet “ratchets” as the scope gradually straightens out. Three or four pulls accompanied by three or four ratchet releases to straighten the tip through the cords is all that will be required to intubate most patients awake. With practice, “scope time” will drop to 10 seconds.
Endotracheal tube placement
Sliding the tube over the fiberscope is not always as straightforward as one would expect. In fact, getting the bevel of the tube caught on periglottic structures is relatively common. The best way to prevent this is to minimize the difference between the diameter of the scope and the internal diameter of the tube from the beginning: the biggest available scope with the smallest allowable tube is a nice place to start (i.e. – a 7.0 ETT for a 5.7 scope and a 7.5 ETT onto a 6.4 scope). This minimizes the amount the bevel of the endotracheal tube can extend away from the scope and get caught on epiglottis, a vocal fold, or even a vocal cord (there are bevel-less tubes available that slide in smoothly, but most institutions do not stock them). If, while sliding the tube, it appears to get caught at the glottis – stop advancing. Don’t force or push aggressively because injuries can occur. Analyze the tube: check for the blue line that runs the length of the tube because it is 90° from of the bevel. Pull the ETT back along the fiberscope and globally twist the tube so the blue line is running laterally, forcing the bevel medially, and gently try again. If ETT placement again fails, pull everything out and change tools - increase scope diameter, decrease tube diameter, or both. Don’t be afraid of pulling the scope out of the trachea and starting over, it will only take a few seconds to get back there again. Once the tube is in the trachea, pull the scope out as quickly as possible. The patient is spontaneously breathing through a smaller conduit and now the fiberscope is a significant obstruction. Don’t assess carinal distance in the spontaneously breathing patient because it produces too much dyspnea. You can do this later after induction if necessary, but right now you need the patient to breathe comfortably through the smaller endotracheal tube. This will take a little reassurance and a reminder that they can no longer speak, but they are breathing “great.” The tube will be well tolerated with good RLN ablation, allowing time to connect to the breathing circuit. Confirm persistent end-tidal carbon dioxide detection while securely holding the ETT. If the patient was intubated spontaneously breathing for neurologic considerations, obtain a final post-intubation, pre-induction examination. The patient can then be gently induced inhalationally or a little intravenous hypnotic can be added if they become anxious from the smaller conduit of ventilation.
Putting It All Together
Once you have decided to perform an awake fiberoptic intubation and have discussed your plan with the patient, it is time to put all the skills together. The Venn diagram in Figure 1 illustrates how each aspect of the procedure overlaps to achieve a smooth and efficient fiberoptic intubation. Pitfalls are noted for when a key component is missing, such as losing cooperation from over-sedation or pushing through a gag reflex that has not been adequately ablated.
12-Step Approach to an Expedient Awake Intubation
Link to a 5-minute video of an awake fiberoptic intubation is available at:
https://school.wakehealth.edu/Departments/Anesthesiology/awake-intubation
- Start with a reassuring discussion with the patient about the fiberoptic intubation, emphasizing safety and ensuring sedation will be given as necessary: “Hey Mrs. Jones, the fact that your neck is broken has us all a bit concerned. We need to place a breathing tube in your windpipe safely without moving your neck. We’re going to take away your gag and cough reflexes for a few minutes to do this. Don’t worry – we’re going to keep you comfortable the whole time and you won’t gag, cough or even care. You might not even remember any of it.”
- Begin the sedation in the holding room en route to the OR. We typically start with midazolam or fentanyl, then add the other and ketamine (5-10 mg) when we enter the room. Reduce doses by half if elderly, injured, or if there is already preexisting sedation.
- Once in the OR, position the patient on the OR table with head of bed elevated to 30°-45°. Place monitors and nasal canula at 2 L/min on the patient and assess sedation status. Turn IV to steady drip to allow for addition sedation to reach patient in timely manner.
- Prepare breathing circuit by turning on fresh gas flows in anticipation of hooking the patient up to the circuit once intubated.
- While standing on patient’s right side (if you are right-handed), gently palpate for the incisura with your left hand to perform the SLN block. Using a standard 10-cc syringe with a 23-gauge needle attached, hold the syringe ready to inject in your right hand and inject 3 cc of 2% lidocaine bilaterally into the THM just off your left index finger, the 1/3 approach. Consider 6 cc in the midline for smaller patients. The injection should be met with a little resistance, giving tactile feedback that the needle is positioned within the membrane and is not superficial to it. It is important to inject into the THM or the fat pad just deep to the THM in order to adequately soak the SLN. There should be 4 cc of lidocaine remaining in the syringe. Assess the patient’s sedation and give additional medication if needed.
- Next, ask the patient to open their mouth and stick out their tongue. Using a Miller 2 blade, gently slide the blade along the lateral edge of the tongue taking care to not allow the blade to slide on top of the tongue and elicit a gag reflex. Once inserted nearly to the palatoglossal fold, gently tilt the tip of the blade medially to expose the thin mucosa of the palatoglossal fold. Inject 2 cc of 2% lidocaine into this fold (bilaterally) with a 25-gauge Whitacre needle to ablate the gag reflex from the lingual branch of the GPN. The length of the spinal needle gives you better visualization during injection as the syringe will be outside the mouth. Assess sedation again and give additional medication as needed since the next block is the most stimulating of the three. Be careful not to over-sedate, but do not forget flumazenil and naloxone if you do.
- Finally, the RLN is blocked using 5 cc of 4% lidocaine injected through the cricothyroid membrane. Place your index and middle fingers on either side of the trachea with the tips of each finger gently marking the depression made by the CTM. Use a 20-gauge needle to pierce the skin between your index and middle fingers and gently aspirate as you advance until you aspirate air bubbles in the syringe (use a 10-cc syringe filled with 5 cc of lidocaine to allow for plenty of true air aspiration). Stabilize the needle with your non-dominant hand to prevent excessive movement of the needle should the patient begin to cough. At end-exhalation, ask the patient to hold their breath. Inject the lidocaine quickly and remove the needle. Apply gentle pressure to prevent hematoma formation at the site.
- Load the ETT onto the fiberscope using a water-based lubricant. This step allows time for the RLN block to set up since it requires a minute or two for the topical lidocaine to work. Assess gag ablation by gently touching the posterior aspect of the tongue with the laryngoscope blade or suction device prior to placing the scope.
- Instruct the patient to open their mouth and stick out their tongue. They should continue to breath normally. Keep the scope straight between your two hands (left hand holding the scope 10 cm from the tip and the right hand with thumb on the flexion-extension trigger held to your right eye) as you face the patient while standing on their right side. Insert the scope midline along the tongue, push slightly on the trigger to visualize the glottis, and run the scope along the tongue as your left hand steadily pulls the scope. With each movement made to advance the scope with the left hand, the right thumb will make small adjustments to keep the glottis in view. Once past the vocal cords, advance the scope a few centimeters, taking care not to go too deep and past the anesthetized mucosa.
- To deploy the ETT, apply steady gentle pressure around the back of the oropharynx and through the vocal cords. If the ETT gets stuck at the cords, stop pushing and pull the ETT back onto the scope without removing the scope from the trachea. Spin the ETT such that the blue line is lateral and advance again. Once the ETT is past the cords, remove the fiberscope quickly and hook up to the breathing circuit to confirm end-tidal CO2.
- You can perform a brief neurologic examination at this point before gently inducing anesthesia.12.Congratulate the patient on a safe intubation while they are being induced. Once the patient is apneic, confirm bilateral breath sounds before securing the ETT.
- Congratulate the patient on a safe intubation while they are being induced. Once the patient is apneic, confirm bilateral breath sounds before securing the ETT.
Conclusion
The awake fiberoptic intubation remains the gold standard for the Difficult Airway. It is therefore of vital importance that providers feel empowered to successfully perform this procedure in a variety of clinical settings, and to do so in a way that is both safe and expedient. We will continue to face mounting production pressure going forward, but patient safety need not be compromised. To this end, this technique has been streamlined over many thousands of awake intubations to be both fast and safe.
Conflicts of Interest
None
References
2. Benumof JL. Management of the difficult adult airway. With special emphasis on awake tracheal intubation. Anesthesiology. 1991 Dec 1; 75(6):1087-110.
3. Domino KB. Death and brain damage from difficult airway management: a “never event”. Canadian Journal of Anesthesia/Journal Canadien d'Anesthésie. 2021 Feb; 68(2):169-74.
4. Roth D, Pace NL, Lee A, Hovhannisyan K, Warenits AM, Arrich J, et al. Bedside tests for predicting difficult airways: an abridged Cochrane diagnostic test accuracy systematic review. Anaesthesia. 2019 Jul; 74(7):915-28.
5. Lundstrøm LH, Rosenstock CV, Wetterslev J, Nørskov AK. The DIFFMASK score for predicting difficult facemask ventilation: a cohort study of 46,804 patients. Anaesthesia. 2019 Oct; 74(10):1267-76.
6. Canty DJ, Poon L. Superior laryngeal nerve block: an anatomical study comparing two techniques. Journal of Clinical Anesthesia. 2014 Nov 1; 26(7):517-22.
7. Chatrath V, Sharan R, Jain P, Bala A. The efficacy of combined regional nerve blocks in awake orotracheal fiberoptic intubation. Anesthesia, Essays and Researches. 2016 May; 10(2):255.
8. Fowler JG, VanEenenaam Jr DP, Johnson KN, Courtemanche CD, Strathman AJ, Reynolds JE. Single midline injection for bilateral superior laryngeal nerve block. Journal of Clinical Anesthesia. 2020 Jun 6; 66:109922.
9. Saliba DL, McCutchen TA, Laxton MJ, Miller SA, Reynolds JE. Reliable block of the gag reflex in one minute or less. Journal of Clinical Anesthesia. 2009 Sep 1; 21(6):463.